Instructions for the Mississippi River cushion
Notions
a) 3 New Orleans designs ("willow01", "mississippi_steamer" and "melanie").
b) Print outs of the abovementioned 3 New Orleans designs.
c) Dusty pink coloured silk fabric - 30.0 x 22.0 inches (76.0 x 56.0 cms).
d) Pellum and tear-away backing.
e) Large sheet of paper.
f) Ruler
g) Chalk or soft pencil
h) Dusty pink coloured decorative upholstery rope - 52.0 inches (132.0 cms).
Print out the four designs. Ensure that all the prints are actual size.
Determine and mark the centre of each of the three print-outs.
Carefully cut around each of the three printed designs, so that each of the designs can be positioned on your fabric in the selected positions.
Lay out and position each of the three designs on a large piece of paper in the positions which you finally desire to stitch out on your fabric.
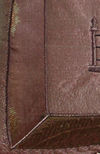
The three designs look better and will have more spatial orientation when combined if you do not have them positioned directly beside one another. Ensure that the "melanie" design is positioned centrally, below the other two designs and that it slightly overlaps the leaves of the "willow01" design on the left hand side and the stern of the "mississippi_steamer" design on the right
Glue or tape each of the three printed designs onto your large piece of paper.
Overelay, position and pin your large sheet of paper over your fabric.
Carefully, using a very soft pencil, mark the centre points for each of the three designs on your fabric, through your printed designs.
Pin the pellum and the tear away backing onto the fabric.
Commence by stitching out the "willow01" design on the top left hand side.
Remove hoop and reposition it to the top right hand side of your fabric.
Next, stitch out the "mississippi_steamer" design in the selected position.
Remove hoop and reposition it centrally, below and between the "willow01"
Don't forget the overlay of this design - Refer to #5, above.
Stitch out the "melanie" design in the selected position.
Just let your own imagination run riot. Use the decorative stitches of your machine to create any further water and wave motion around and about the designs.
Instructions for the Garden District Cushion
Notions
a) 1 New Orleans designs ("garden_district").
b) Dusty pink coloured silk fabric - 24.0 x 28.0 inches (61.0 x 71.0 cms).
c) Dusty pink coloured silk fabric - 24.0 x 28.0 inches (61.0 x 71.0 cms).
d) Strip of good quality silk remnant - 43.0 x 1.25 inches (110.0 x 3.0 cms)
e) Dusty pink coloured decorative upholstery rope - 52.0 inches (132.0 cms).
Carefully, using a very soft pencil, mark the centre point of the design on your fabric.
Pin the pellum and the tear away backing onto the fabric.
Stitch out the "garden_district" design in the centre of your fabric.
Cut the remnant strip of fabric to size - 2 lengths of 10.0 inch and 2 lengths of 11.5 inches (29.0 cms)
Iron the 4 strips of fabric onto vlisofix backings
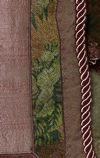
Trim the four strips to create an attractive rectangular border frame around the design . Please refer to the photos provided.
Iron the 4 strips of fabric onto the face of the cushion to form the frame.
Sew around all the edges of the border frame using a small satin stitch in a dark dusty pink coloured thread.
Using a decorative stitch from your machine, sew around the outside edge of the border frame in a dark dusty pink coloured thread.

Instructions for the Melanie Cushion
Notions
a) 1 New Orleans designs ("melanie") and ("Fun")
b) Quality white coloured silk fabric - 24.0 x 22.0 inches (61.0 x 56.0 cms).
c) Pellum and tear-away backing.
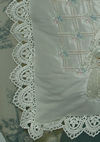
d) Strip of good quality white silk lace - 46.0 x 1.0 inches (117.0 x 2.5 cms).
Strip of good quality white silk lace - 46.0 x 1.0 inches (117.0 x 2.5 cms).
Determine and mark the centre of each of the three print-outs.
Carefully cut around each of the three printed designs, so that each of the designs can be positioned on your fabric in the selected positions.
Lay out and position each of the three designs on a large piece of paper in the positions which you finally desire to stitch out on your fabric.
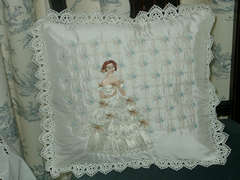
The three designs look better and will have more spatial orientation when combined if you do not have them positioned directly beside one another. Ensure that the "melanie" design is positioned centrally, below the other two designs and that it slightly overlaps the latticework of both the "fun" designs Please refer to the photos provided.
Glue or tape each of the three printed designs onto your large piece of paper.
Overelay, position and pin your large sheet of paper over your fabric.
Carefully, using a very soft pencil, mark the centre points for each of the three designs on your fabric, through your printed designs.
Pin the pellum and the tear away backing onto the fabric.
Commence by stitching out one of the "fun" designs on the left hand side.
Remove hoop and reposition it to the right hand side of your fabric
Next, stitch out the second "fun" design in the selected position.
Remove hoop and reposition it centrally, below and between both "fun" designs. Please refer to the photos provided for exact positioning.
Don't forget the overlay of this design - Refer to #5, above.
Stitch out the "melanie" design in the selected position.
Complete the assembly and border decoration of the cushion


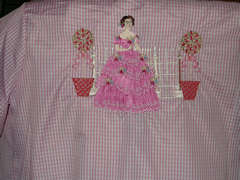
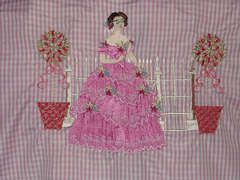
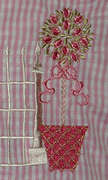
New Orleans designs, "fence", "rose_tree" and "melanie"
Print out, position and glue the three designs on a large sheet of paper
Overelay, position and pin your large sheet of paper over your fabric...
Mark the centre points for each of the three designs on your fabric.
Pin the pellum and the tear away backing onto the fabric.
5. Stitch out the designs in sequence, allowing for the overlaying of the "rose_tree" designs on the "fence" design and, in turn, the overlaying of the "melanie" design on the "fence" design.
Please refer to the photos provided, below.