


Notions
a) 7 Cock-horse designs.
b) Drawing paper to make a graph. (Re-cycled computer broad sheets are ideal
c) Ruler and adhesive tape.
d) Chalk or soft pencil.
e) Print outs of all the Cock-horse designs.
f) Blue and white gingham fabric 39 inches (1 metre).
g) Medium weight iron on wadding.
h) Heavy backing fabric.
i) Zipper - 16 inch (40 cms) heavy duty. This type is the safest and the best for children.
Using the sheet of drawing paper, prepare a graph by marking Cut out the shape of all the designs. Mark the outline of the proposed shape of the bag on it using a soft pencil or marking pen.
Print each of the Cock-horse designs. I used the Buzz Tools™ program. Select the "Actual Size" mark the centre of each printed design
Cut out the shape of all the designs. Arrange each of the designs on the graph paper, as shown below Arrange each of the designs on the graph paper, as in diagram No. 1 & 2.
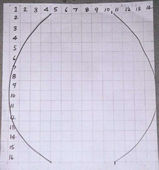
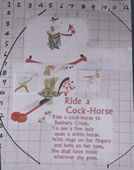
Diagram No 1 Diagram No 2
Lay a sheet of iron on wadding on top of the sheet of heavy backing fabric, as shown to the in diagram No. 3.
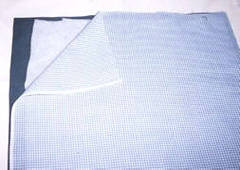
Diagram No 3
Decide where you want to position the graph paper on the fabric square. Ensure that the graph paper is taught. Mark four reference points on the fabric where you wish to position the graph paper. Pin at each corner of the graph paper, as shown in diagram No. 4.
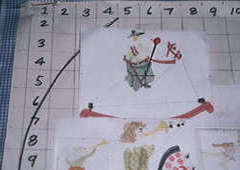
Diagram No 4.
Locate the marked centre of each printed design. Select the first design. Insert a pin where you have marked the centre, as shown in diagram No. 5. Hold the pin firmly and lift the graph paper. Carefully mark the centre point on the fabric with either chalk Repeat this process, marking the centre of all the printed designs on the fabric.
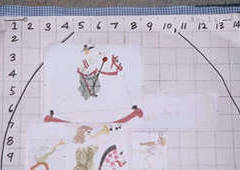
Diagram No 5
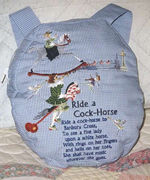
Commence stitching the designs on the front panel, using the marked centre points on the fabric as your references. Start with the banbury_ cross design. Follow this design with the banbury, banbury_boy then the banbury_rhyme designs. Stitch the fairy designs wherever!!
Cut the shape of the front and back panels, as shown in diagram No. 6
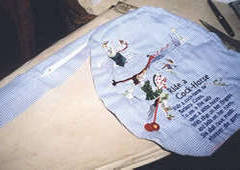
Diagram No 6
Measure the length of the outside edge of the front panel. Add at least 8 inches (20 cms) to this length. Using this length and a width of 6 inches (15 cms), measure, mark and then cut a length of fabric for the facing of the bag.
Fold the facing in half whilst ironing, so that you produce a nice, crisp edge. Measure and mark the middle of the facing with either chalk or soft pencil. Cut along the facing with your scissors, down where you have marked the crisp edge. Mark the centre position for the zipper. Ensure that you match the centres for both the zipper and the facing. Insert zipper
Mark the centre of the top edge of the front panel of the bag. Match all the centres, so that you have a base from which to continue to work. Pin the facing all the way around the bag as shown in diagram No. 7
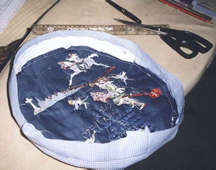
Diagram No 7
Attach the facing to the front panel by stitching them together
Cut out a long piece of fabric for the straps for the bag. The length of this fabric would depend on the size of the bag. The size which I used was 39 x 4.5 inches (1 metre x 11 cms). Cut the fabric for the straps in half, along its length. You should now have two, long pieces. Iron down the centre of each of the straps and then stitch each them together to make a strap. You should now have two straps, as shown in diagram No. 8
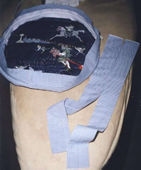
Diagram No 8
Pin the straps to the bag, as shown in diagram No. 9
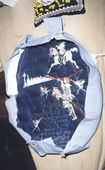
Diagram No 9
Attach the straps to the facing of the bag. I like to to triple stitch each of the strap ends to ensure that they are nice and completely secure.
Attach the back panel to the bag by stitching them together.


