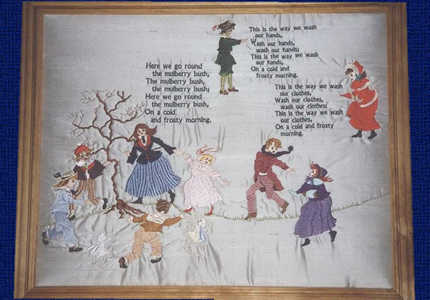
Mulberry Bush Machine Embroidery Design Instructions

What you need:
a) 14 Mulberry Bush Cross designs.
b) Drawing paper to make a graph. (Re-cycled computer broad sheets are ideal).
c) Ruler and adhesive tape.
d) Chalk or soft pencil.
e) Print outs of all the Mulberry Bush designs.
f) Pale blue silk fabric (larger than the size of the frame).
g) Medium weight iron on wadding.
h) Heavy backing fabric.
i) Thick wadding (larger than the size of frame).
Using the sheet of drawing paper, prepare a graph by marking 1 inch (2 cms) squares, as shown to the right. The graph should be the same size as the proposed wall hanging. The method used here is the same as that used for preparing and laying out Cock Horse Design
Print each of the Mulberry Bush designs. I used the Buzz Tools™ program. Select the “Actual Size”
Cut out the shape of all the designs. Arrange each of the designs on the graph paper in the same positions as shown on the finished wall hanging to the right, or in the positions which you prefer. Tape all the printed designs on the graph paper.
Lay a sheet of iron on wadding on top of the sheet of heavy backing fabric, as shown to the right. Lay the sheet of pale blue silk fabric on top of the wadding.
Position the graph paper on the pale blue silk fabric panel. Position the graph paper on the pale blue silk fabric panel. Mark four reference points on the fabric panel where you wish to position the graph paper. Pin graph paper to the fabric panel at each corner of the graph paper.
Locate the marked centre of each printed design. Commence at the left hand side of the fabric panel. Select the first design. Insert a pin where you have marked the centre. Hold the pin firmly and lift the graph paper. Carefully mark the centre point on the fabric panel with either chalk or soft pencil. epeat this process, marking the centre of all the printed designs on the fabric. This is the same procedure as in the Cock Horse design
Commence at the left hand side of the fabric panel. Proceed by stitching the designs on the fabric panel, using the marked centre points on the fabric and the following sequence as your references. Start with the mul_boy01 design. Follow this design with the mul_girl01 design. If you have the large hoop for the large tree design, I suggest that you select a fair colour for the girls hair, not the tan/brown colour, as the details of the tree will be lost in her hair!! :)) Next, stitch either the large or small mul_bush design in front of (overlapping) the designs of the two figures just sewn. Do not worry about stitching over the designs of children, as that makes the design look very good. Once again, move to the left hand side of the fabric panel. Proceed by stitching the mul_boy02 design. Follow this design by stitching this sequence of designs:- mul_boy05, mul_girl04, mul_boy04 and mul_girl03, moving each time across the fabric panel to the right. Next, stitch the mul_rhyme01 design above and in between the mul_girl01 and mul_girl04 designs. If in doubt, please refer to the photo of the finished fabric panel, shown above. Move to the top, centre of the fabric panel. Stitch the mul_boy03 design. Next, stitch the mul_rhyme02 design to the right of the mul_boy03 design. ul_boy03 design. Move to the right. Beside the mul-rhyme03 design, stitch the mul_girl02 design.
The major part of the decoration process is complete. It is now time to add the fairy03sm and fairy03sm_r designs.
